ASSIGNMENTS
1. Control a board from a local wireless network. Program a microcontroller to obtain and respond to information from the internet. Optionally, work with a partner to control a device over a remote server.
Simple WiFi Server
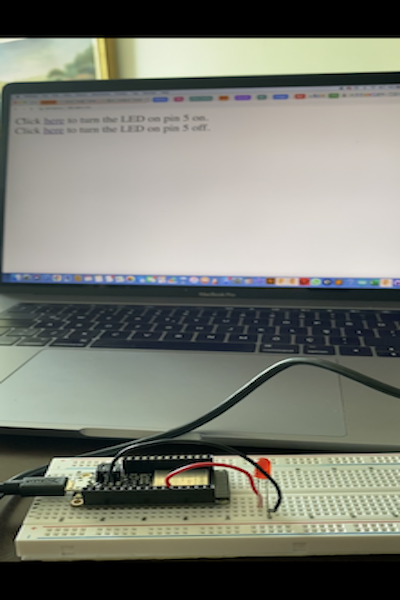
This was my first time working with the Huzzah board, so I spent most of the lecture trying to configure Arduino IDE to work with the Huzzah. I installed the drivers and boards, and everything seemed to be working well. Now, I could start working on the code. Following the tutorial on the website, I managed to create the simple Wifi server.
After I made the required changes on the example code, I built a basic circuit with one red LED. It was a bit of a challenge to figure out the pinout of the Huzzah Board, but with the help of this website, I was able to figure out how to connect the wires.
With the circuit built, I uploaded the code to my Huzzah Board, and opened the Serial Monitor. I pressed the rest button on the Huzzah, and got my IP address. By pasting this address to my browser, I was able to open the website that would control my red LED. The ESP32 was now acting as a web server on my local network, and I was able to control the LED from different devices. This was a really fun project to work on.

Using Google Firebase
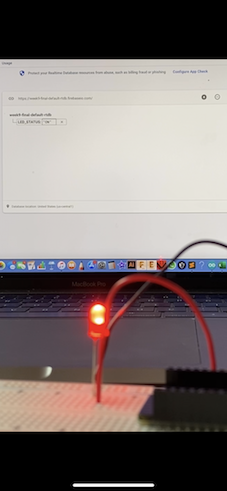
Now that I finished the Simple Wifi Server, I could start working on talking to my ESP32 from outside of my LAN. I decided to follow the tutorial, and use Google Firebase. I signed into Firebase, and created a new project for this week's assignment. I followed each step, and everything was seeming to function correctly. I already had the LED circuit built, so I uploaded the given code after making the required changes.
I could now toggle the LED by writing ON/OFF on the screen. I also created a web interface using the given html code. Using Firebase, I made all of the required changes to the code, and managed to get the website working. I really liked how the buttons on the website were functioning, so I decided to use the web interface for my assignment as well.
Wifi Controlled LED Strip
For the assignment I needed to program a microcontroller to obtain and respond to information from the internet. I had used the LED strip for week 8's assignment, and enjoyed it a lot. Therefore, I decided to try and control the LED strip via a web interface. I took the same example wifi code that used for the red LED, an changed several aspects on it. To be able to control the LED strip efficiently, I also downloaded an example LED code from Adafruit NeoPixel. I took some of the functions from this NeoPixel code, and merged it with my wifi code.
I had to research some LED strip functions to make sure that everything would function correctly. I worked on the Arduino code for quite a bit, and everything seemed right. Finally, I needed to alter the html code of Firebase so that it would match the LED strip code that I had. I uploaded all of the new codes, and everything worked perfect. I had three functions on the web interface.
The first one was called "rainbow" and it would create rainbow colors on the LED strip and trigger the respective function. The other one was called "theater", and would shine the LED lights in a whole different way. I finally added an "Off" button to dim all of the lights on the LED strip. All the buttons and the functions worked perfectly. The only thing that seemed a bit off was the delay. Since the buttons trigerred the functions that I wrote down on Arduino, I had to wait for the loop to end until once before I can turn off all the LEDs. Nevertheless, I liked the way that the interface wasd working in the end, and I managed to control the LED strip through Wifi.